
Modern sets do not usually have field markings (see photograph
above). However, for those players who prefer the old style fields the
markings have been included in this section.
Please read Spinmaster Equipment before continuing, and learn the names of each piece of equipment.
Remember that the
handle of the sword is 10cm long and the blade of the sword is 20cm
long. You use the swords to place your shields.
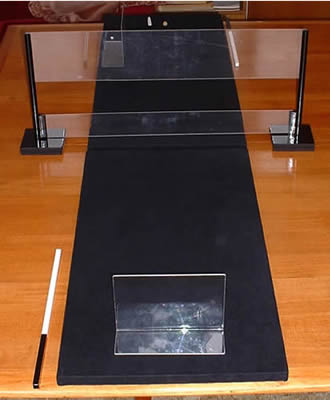
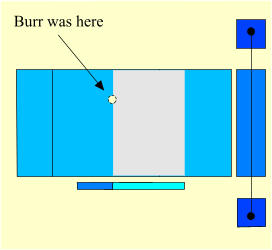
The equipment
can be arranged to give four Levels of difficulty: beginners, improvers,
advanced, and spinmasters. The photograph above shows the set for advanced
players.
"I can still remember the first time I made the ball swerve around my opponent's shield and roll onto his field. What a rush! You should have seen his face."
With one flick of your stick propel the burr so that it travels under the sky and comes to rest on your opponent's field.
If
you fail then your opponent gains a point and the game restarts with a
serve. Spin to win!
If your fields have markings put the 10cm lines nearest the ditches.
Place the swords with their handles nearest the ditches.
Leave out the hedge.
Before your opponent plays the burr, you must place your shield on your field. It must be upright, facing the sky, parallel to the sky, and no part of it may overlap the edge of your field.
When it's your turn
to play the burr you can remove your shield from your field and put it
to one side, out of the way.
"You know what I'd like. Really. I'd like to see a slow motion replay of some of my best shots. You know, like when it really bends. It'd be wicked, wouldn't it?
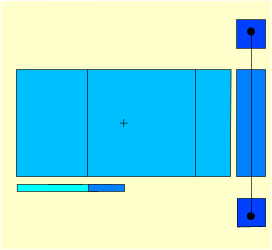
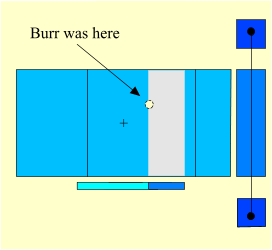
The receiver places his shield 20cm from the back of his field. The server places the burr 20cm from the back of his field and equidistant from the edges.
Notice how, the sword is placed so that the burr is opposite the point where the handle and blade meet, and also how (for beginners) it is the handle of the sword that marks out a grey shaded area on the above diagram.
If the burr comes
to rest on the receiver's field then the server places his shield somewhere
in the area shaded grey on
the above diagram.
A player
keeps serve for an entire game and then his opponent serves. There are
no second
serves in spinmaster. If you
don't get the burr on your opponent's field first time then your opponent
gains a point.

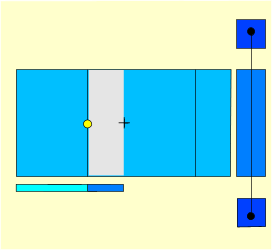
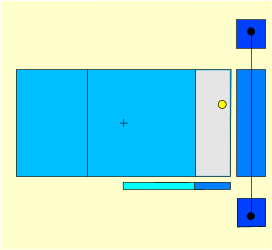
If the burr comes to rest on your opponent's field then place your shield within the shaded area (see above).
Notice,
once again, (how for beginners) it is the handle of the sword
that marks out the shaded area into which the shield must be placed. Remember
too, that when we talk about the shield we refer to the front face only,
not the shield supports.
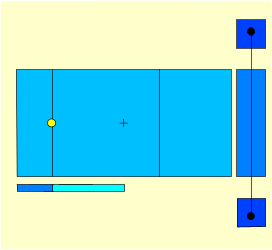
If your fields have markings put the 20cm lines nearest the ditches.
Place the swords with their blades nearest the ditches.
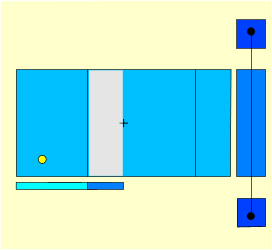
When serving the receiver places his shield 10cm from the back of his field. The server places the burr 10cm from the back of his field and equidistant from the edges.
The lower diagram above
Notice how, the sword is placed so that the burr is opposite the point where the handle and blade meet, and how it is now the blade of the sword that marks out a grey shaded area on the diagram.
Leave out the hedge
Slot in the 2.5cm hedge
Slot in the 5cm hedge
The shot which turns the burr by far the most is
the thumb down sweep. (See Hints on Flicking)
An ambidextrous player would therefore be able to use that shot to turn
the burr either from right to left or from left to right. This not only
gives him an unfair advantage but also diminishes the game by
eliminating the neccesity of mastering other types of shot, and so ...
Ambidextrous play is not allowed.
The stick must be held in the same hand throughout the entire match.
The
photograph above shows some fancy hand crossing to mimic ambidextrous
play. This is not allowed either, for exactly the same reasons
that have been given above. Your right hand must always remain on the
right hand side of your left hand.
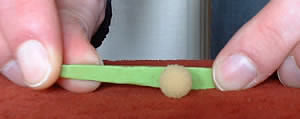
The Straight Punt
The finger and thumb are close together. The stick is pulled back from the burr by the index finger on your other hand and released. There is no follow through. For right handed players the burr may move slightly from right to left.

The Thumb Down Sweep
The thumb is lower down the stick than the finger. The stick is not pulled back. The thumb sweeps the stick through the burr and gives it tremendous spin. For right handed players the burr moves from right to left.
The Top Spin Sweep
Hold the stick almost upright. Again, do not pull the stick back. Use your thumb to sweep the stick forward and sideways. For right handed players the ball moves a little from left to right and also dips quickly. For extra spin with this shot try holding the wide end of your stick.
The Lob
Don't forget that you can lob the burr over your opponent's shield. If you sweep your stick under the burr as you hit it then you'll also impart back spin to the burr and this will help to stop it rolling off the back of your opponent's field.