
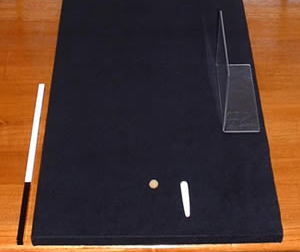

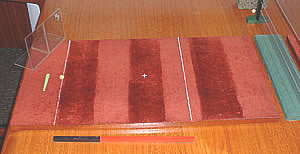
The fields shown above were cut from 15mm MDF and covered with a navy blue, brushed cotton-viscose cloth. I like its colour against the black supports and the yellow burrs show up clearly against its dark background. Choose whichever colour scheme you like.
However, a brushed-cotton type material gives just a touch of friction to the burr (as does velvet) and that is what we need for a field surface. Smooth, satin-type materials should not be used.
The shields, sky and hedge were made from 3mm clear acrylic. The supports, swords and mini bats were made from wooden pegs and painted with a hard wearing enamel paint. The burr has been cut from a sponge-backed washing up scritcher.
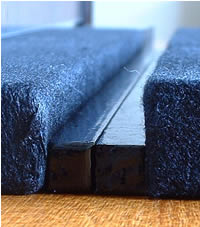
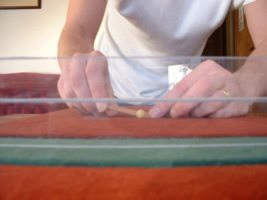
Spinmaster sets have
a spacer inserted into the ditch. The spacers have to be about 15mm wide
in order to let the burr roll into the ditch. In the photograph above
the spacer is made from two strips of wood. The fields are butted against
the spacers.
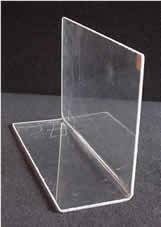
The shield was made from a single piece of acrylic which was gently heated
on a hot wire machine and bent into shape. Most secondary schools have
a hot wire machine so it's worth asking if they are prepared to help you
out. See
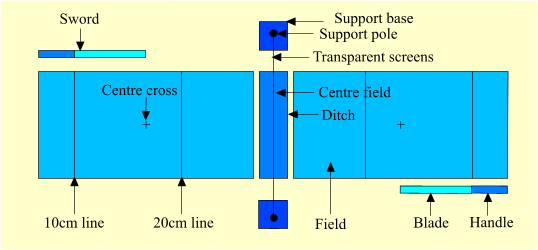
The lower transparent screen is also known as the hedge. (Hedge and ditches)
The upper transparent screen is also known as the sky.
A well made spinmaster set is a thing of beauty. Take pride in your work.

It may be that your local supplier stocks imperial measurements in which case it will be easier to purchase chipboard laminates/mdf in one foot widths.
If so then go with it. The 50cm becomes 20ins, 30cm - 12ins, 20cm - 8ins, 15cm - 6ins, 10cm - 4ins, 8cm - 3.2ins, 1.5cm - 0.6ins.
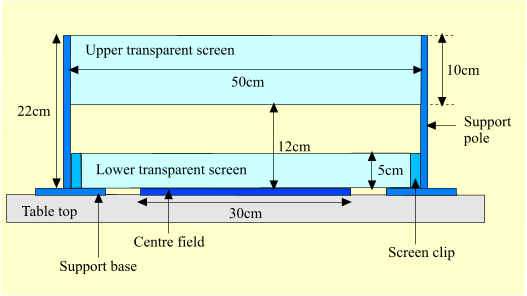
The skillmaker shown above has a 5cm hedge (lower transparent screen.) Therefore it is suitable only for expert players.
Beginners and improvers should play without a hedge, and advanced players should use a 2.5cm hedge.
Imperial measurements: 22cm - 8.8ins, 12cm - 4.8ins, 5cm - 2ins, 2.5cm - 1inch.

Use MDF or chipboard. Ask the store to cut it to the right lengths for you.
Cut your chosen material to cover the top of each field. Stick onto the fields with PVA glue. Trim off or fold under any excess (see photograph above ) and leave to dry. If you choose to trim then any bare chipboard should be either covered with the appropriate edging strip or filled with decorating filler, sanded smooth and painted.
Put three strips of foam draught excluder along the base of the fields and centre field. This will stop them from sliding about during play. Alternatively, a few spots of BluTac will do just as well.
Make sure that the centre field is exactly the same height above the table top as are the other fields.
Cut from clear perspex/acrylic sheet. Your local supplier can advise you on how to cut it and may even cut it for you.
In the photograph, above, a 5cm hedge has been made by stacking two 2.5 hedges on top of each other.
"My mate said that you could play without having to see through the hedges, shields and sky. Stiff card would do, he said, and you could colour them, too. Well that's absolute rubbish. Part of the fun in playing Spinmaster is to see the burr bend through the air. You've got to have them transparent. You've got to see the thing. You've just got to."

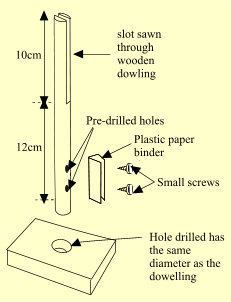
Technically only the front face is the actual shield. The base and triangular section are the shield supports. All are cut from perspex/acrylic. The shield is 15cm by 10cm. The base is 15cm by 5cm. The triangular support has a vertical height of about 9.5cm and a base of about 4.5cm. Use super glue to quickly join them together in place so that you can then smooth a bead of epoxy resin adhesive around each join. Sandpaper the top corners of the shield to make them round. See also the introduction.
If you look closely at the top left corner of the shield you can see that a simple coat of arms has been scratched into the surface.

Any strip of wood/plastic will do. Glue cloth to the bottom so they can slide easily across a table without scratching it.
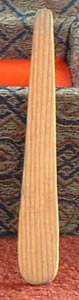
There are no restrictions on the size and shape of the minibats. Just use one that feels comfortable for you. In 2023 my five year old grandson introduced me to the joys of using an ice lolly stick. The extra flex and length of the stick gives a completely different feel to the game, without losing any of the control. (You can play with the stick from a Magnum ice cream too!) He definitely found the lolly stick easier to play with than my purpose made minibats.
However, some people will prefer a rigid home made stick that is durable and never wears out. The photograph shows a 7cm long stick made from a piece of scrap skirting board. A popular choice is to use a wooden washing line peg because it's already about the right size.
Take a piece of wood. Whittle away with a sharp knife until the rough shape has been made. Finish off with sandpaper and varnish or paint if required.
Make and try several sizes until you find the one which suits your game best, or buy an ice lolly.
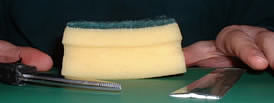
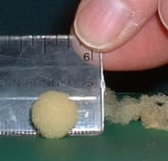
Get a washing up scritcher, a pair of scissors and a ruler. Tear off a piece of the sponge back and start cutting. Cut less and less off at a time as your piece of sponge begins to take shape. Check with the ruler frequently. Depending on the density of the sponge the burr's diameter will be between 11 and 13 mm so stop before then...
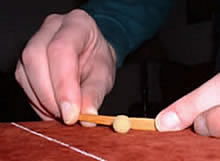
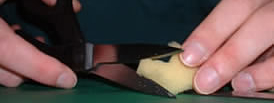
..and start testing it with a stick because the only way to judge the correct diameter of the burr for the particular density of sponge being used is to flick it.
Make the diameter of the burr so that it is sent about 120cm with a moderately hard, straight shot. 11mm diameter sponge burrs are preferable to those which are made from less dense sponge and will have a larger diameter.
"When
I make a burr I continuously roll it around between a finger and thumb
while I'm cutting. I do it totally randomly and get a good approximation
to a sphere without even trying."
"Take
your time. You need a good half hour for just one burr."