American Football but without getting your block knocked off

Introduction
Basics
Accomplished Moves/ The Touchdown And Safety
Scrimmages
Special Restrictions On The Movement Of Pieces
Unrestricted Movement Of Pieces
Blocking
Pushing
Tackling
Fumbling
Kick Off And Return Run (other than from a safety)
Kick Off And Return Run From A Safety
Punt And Return Run
Conversion Attempt
Field Goals
Passing
An Incomplete Snap
Interceptions
The Timing of Each Move
Quick Reference Guide - Field Goals
Quick Reference Guide -
Passing
The rules of American Football are many and for that reason Touchdown has many rules. This is a game for those people who already know the rules of American Football. If you don't, then it will take you a long time to work out what's going on! And you may never know why!
Although Touchdown has been designed to mirror the outdoor game as closely as possible it has been necessary to limit the number of pieces per side to seven and to introduce some special restrictions on their movement.
If
you haven't learned how to play Quarterback
then do that first, because that game teaches you how the pieces can move,
pass, tackle, block, and push (although in that game the quarterback can
sometimes move four squares, which is not allowed in this one).
The rules encourage passing play and introduce luck with the roll of dice.
It's exciting stuff.
A full game takes a long time. So use a chess clock or egg timer or your phone to limit the time for each player's moves.
The game begins with a kick off from the 11th row and a return run from the offense. Thereafter, the offense have two plays to gain 10 rows or more. If they don't then they lose possession and the opposition takes a first down from the row on which the ball became dead.
The offense can punt,
or attempt field goals, as described later.
The game is divided into four quarters. Each quarter consists of 15 scrimmages.
At the start of a new quarter the team which kicked off the previous quarter
now receives the opposition's kick off.
Throughout these rules pieces are represented by the following symbols.
The defense must move two different pieces each turn. i.e an Accomplished Move.
For the offense to
accomplish a move, it must either:
move two different pieces, or
move one piece and then pass the ball, or
pass the ball and then move a piece, or
pass the ball and then pass the ball again.
The moved piece may or may not be the ball carrier.
A team scores a Touchdown when one of its pieces is holding the ball in the opposition end zone. It is worth 6 points. Immediately afterwards the offense attempts a conversion.
A Safety is scored when a player sends the ball into his own end zone and either it goes out of play behind the goal line (e.g. from a fumble or lateral pass) or one of his pieces is holding the ball and is tackled. Also if one of his pieces is holding the ball in his own end zone he can simply declare a safety. A safety is worth two points and is awarded to the defense. The team conceding the safety must restart with a kick off from its own 6th row.
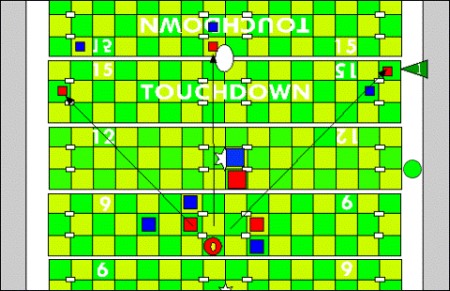
The
line up of pieces on the board ready for the start of any play including
kicks is called a Scrimmage (or down).
A typical scrimmage is shown below.
Red is Offense. The pieces with the small white squares on are the interior
line.
The number of pieces allowed on the board at a scrimmage is fourteen: seven for the offense and seven for the defense.
The offense must place all its seven pieces first. Once placed they cannot be moved until after the start of the play.
From every scrimmage play must begin with a Snap. This is a backward pass in which the ball must travel vertically backwards - not diagonally.
Only the Quarterback is allowed to receive the snap and it must not be more than three squares behind the centre (see diagram)
From a scrimmage that results in a kick, be it a kick off, punt, field goal or conversion attempt, it is only necessary for the ball to be placed on the appropriate square: all other pieces may be left off the board.
The square last occupied by the most recently tackled piece is called the Tackle Square.
From the tackled piece's point of view the line across the board touching the front of the tackle square is called the Line Of Scrimmage and the row immediately behind the the line of scrimmage is called the Row Of Scrimmage.
The piece holding the ball at a scrimmage is called the Centre and it must be placed inside the hash marks and on the row of scrimmage.
If the tackle square lies outside the hash marks to the right then the centre is placed on the square immediately inside the right side hash marks.
If the tackle square lies outside the hash marks to the left then the centre is placed on the square immediately inside the left side hash marks.
At a scrimmage each player's pieces must be on their own side of the line of scrimmage.
There must be a one row gap between the line of scrimmage and the defense's front line pieces, no more, no less.
All pieces on the row of scrimmage, except those at the extreme ends are called the Interior Line.
All interior line pieces must be on adjacent squares and two of them must be within the hash marks.
No Triple is allowed to be part of the interior line.
The offense must play with a Quarterback, a Single and three Triples. (This prevents stalemate situations and encourages the defense to 'sack' the Quarterback)
The defense must have three pieces directly opposite the interior line, and with only a one row gap between, and cannot field a Quarterback.
There are no other restrictions on where the defense pieces may be positioned.
No defense Triple is allowed to cross the line of scrimmage.
No offense piece
is allowed to go more than 5 rows behind the line of scrimmage and that
includes the ball carrier.
Although
these rules are unlike any restrictions in the outdoor game they are necessary
here in order to make the game work and in fact with these rules the board
game simulates the real thing more closely than if they were omitted.
When pieces are free to move without restriction from opposition pieces they can move as follows
A Single can move one square in any direction.
A Double can move one square in any direction and then if wanted another square in any direction.
A Triple and Quarterback can move as a Double but with the option of moving yet another square in any direction.
It is important to learn the Blocking Strengths of each piece.
The strongest is the Single.
The second strongest is the Double.
The weakest are the Triple and Quarterback.
When a piece moves past another piece of equal or greater blocking strength it is not allowed to move diagonally from one square which is adjacent to the opposition piece to another square which is adjacent to the same opposition piece - unless it is being pushed. (See Pushing) It can move perpendicularly around the opposition.
There are no restrictions put on how a piece can move past an opposition piece of weaker blocking strength.
A Triple or Quarterback is not allowed on any square adjacent to a square occupied by an opposition Single.
The first three diagrams below show moves that are not allowed.The last three show moves that are.


Blocking strength also controls if and how a piece can push an opposition piece off its square.
A piece is able to push an opposition piece of weaker blocking strength off its square.
In most cases it will do this by moving onto the opposition piece's square and then the opposition piece is moved backwards in the direction in which the 'pushing' piece moved.
E.g.1


E.g.2
E.g.3
E.g.4
E.g.5
E.g.6

A Single can push an opposition Triple or Quarterback by simply moving onto a square that is adjacent to the opposition piece.
The opposition piece
is then pushed off its square and moved one square backwards in the direction
of push which is calculated as follows. When the Single is moved onto
the adjacent square an imaginary line is drawn from the middle of it to
the middle of the opposition piece's square. This line marks the direction
of push.
E.g.7

A piece cannot be pushed off its square if the square it should be pushed onto is already occupied, or if it would be pushed off the board.
In addition, a Triple or Quarterback cannot be pushed if the square it should be pushed onto is adjacent to an opposition Single
In the three examples
below the arrows show the direction of the intended push. In all
examples the push is not allowed.
E.g. 8,9,10
A piece cannot push an opposition piece of equal or greater blocking strength, and the piece with the ball cannot push at all.
While the offense is still in a position to make a forward pass no offense eligible forward pass receivers can be pushed after they have moved more than one row forward over the line of scrimmage.
In most cases a tackle is made on the piece holding the ball by a defense piece which moves onto the ball carrier's square. This is the only circumstance under which two pieces can share the same square and therefore the tackle must be attempted.
However, a Single can attempt to tackle a Triple or Quarterback simply by moving onto a square that is adjacent to the one on which the Triple or Quarterback stands. This is the only circumstance under which a Single is allowed on a square adjacent to an opposition Triple or Quarterback and therefore the tackle must be attempted.
A Triple and Quarterback cannot attempt to tackle a Single.
There are no other restrictions on tackling.
All the eight diagrams below show legal tackles.
E.g.1 to 8


Once the defense has moved into a position to attempt the tackle as shown above the defense must roll two dice.
If the dice show any total other than 4 or 7 then the tackle is successful and a new down is begun.
If the dice show a total of 4 then the offense fumbles.(See below)
If the dice show a total of 7 then the tackle is missed.
A piece which misses a tackle is marked with a missed tackle marker.
A piece marked with a missed tackle marker must remain where it is and take no further part in the game until the next scrimmage. However its blocking strength remains so that it can still restrict other piece's movements.
When a new scrimmage begins any missed tackle markers are removed from their pieces.
Remember - 7 for a miss - 4 for a fumble
If when attempting a tackle the dice show a total of 4 then the offense piece fumbles (i.e. drops the ball) There is always a 1 in 12 chance of fumbling the ball.
Both the tackled piece and the piece which made the tackle are marked with a missed tackle marker.
The offense player spins the number wheel and notes the number which turns up.
Imagine the eight squares around the tackle square are numbered clockwise from 1 to 8, beginning with the bottom left square as the offense sees it.
If the tackled piece is adjacent to the boundary lines then you imagine that eight squares extend over the boundary lines.
The ball is considered to have bounced away from the tackle square in the direction shown by the number wheel.
If the dice showed a 1 and a 3 then the ball is moved 1 square away.If the dice showed a 2 and a 2 then the ball is moved 2 squares away.
In the example below, blue is offense. The red Triple attempts a tackle on the blue Quarterback. The dice show a 2 and a 2. The Quarterback therefore fumbles. Both pieces are marked with missed tackle markers. The offense spins the number wheel and 6 turns up. The ball is moved 2 squares away from the Quarterback in the direction of 6.
If the ball goes over a boundary line then it is put down on the first imagined square and then play restarts from between the hash marks level with that square.
In the example below red is offense. The blue Triple attempts a tackle on the red Triple. The dice show a 2 and a 2. The red Triple therefore fumbles. Both pieces are marked with missed tackle markers. The offense spins the number wheel and 3 turns up. The ball is moved in the direction of 3. It is placed on the first imaginary square over the sideline. Red will take the snap from the shaded square within the hash marks.
If the ball is put out of play beyond the opposition goal line then there is a turnover and play restarts with a scrimmage from the 6th row. (See section on safeties)
In the example below red is offense. Blue attempts a tackle and rolls the dice. A 1 and a 3 turn up. Red therefore fumbles. Both pieces are marked with missed tackle markers. Offense spins the number wheel and 3 turns up. The ball is moved 1 square in the direction of 3 and placed on the first imaginary square over the sideline. The square is behind the goal line (level with the end zone) There is a turnover and Blue restarts with a scrimmage from the 6th row.
In the example below blue is offense. Red attempts a tackle and rolls the dice. A Double 2 turns up. Blue therefore fumbles. Both pieces are marked with missed tackle markers. Offense spins the number wheel and 1 turns up. The ball is moved 2 squares in the direction of 1 and placed on the first imaginary square over the sideline. The square is behind blue's goal line (level with the end zone) Blue concedes a safety and red gains two points. The game restarts with Blue kicking off from its own 6th row.
If the ball is put on a square where there is already a piece then that piece immediately picks up the ball and this applies even if the piece has a missed tackle marker on it.
In the latter instance the marker is removed and the piece can join in the play once more.
If the ball is put on an empty square then play continues normally. The first piece to move onto the square on which the ball rests picks up the ball.
Occasionally the ball must be put on a square where there are two pieces with missed tackle markers on. Players should roll one die each. The player who gets the highest number gets possession - but the ball becomes dead. The ball carrying team is awarded a first down. (See Scrimmages)
If the defense regain possession from a fumble they can't pass forward but can make lateral passes. (See Passing)
After a fumble the restrictions on unrestricted movement of pieces concerning the line of scrimmage are lifted.
The defense places the ball on the 11th row between the hash marks and rolls ONE die. The ball is moved forward 14 squares plus the number shown on the die.
If the ball ends up in the end zone then the offense may either take a first down from the 6th row, or roll two dice.
If the ball does not go into the end zone then the offense must roll two dice.
If
the dice show a total of 4 then the ball is fumbled. It is not
moved forward by 4 squares. The number wheel is spun and the ball
is placed on the appropriate square from the offense's point of view.
The offense roll
two dice and the defense roll one. The defense gain possession only if
its die shows a higher value than both of the offense dice. If a touchdown
or safety is not made then play restarts with a first down from the row
on which the ball was put.
E.g 1. Offense dice 3 and 5, defense die 4. The
offense retain possession.
E.g.2. Offense dice 1 and 3, defense die 6. The defense gain possession.
It's a turn over.
E.g.3. Offense dice 3 and 1, defense die 3. The offense retain possession.
To fumble has a 1 in 12 chance. To lose possession by a fumble has a 1
in 47 chance.
If
the dice show a total of 12 then the ball is advanced 12 squares forward,
placed between the hash marks and the dice are rolled again. If any Double
comes up then the ball is advanced by the amount shown on the dice, placed
between the hash marks and the dice are rolled again. This continues until
a Double is not shown. In this way it is possible
for the ball to be advanced over the opponent's goal line for a touchdown.
E.g. 6,6 then 3,3
then 1,1 then 6,3. The ball is moved a total of 29 squares.
Throwing
a Double six has a 1 in 36 chance. Throwing a Double six and then another
Double straight afterwards has a 1 in 216 chance. Throwing a Double six
and then another Double and then another Double has a 1 in 1296 chance.
If at any stage, on this return run, the dice show a total of four
then the offense fumble. (Refer to paragraph 4).
E.g. 6,6
then 4,4 then 1,3. The offense have fumbled after gaining 20 squares.
If the dice show any total other than 12 or 4 then the ball is advanced by the total shown on the dice, placed between the hash marks and the offense take a first down.
At any scrimmage the offense may choose to punt.
The punter may choose to roll one die or two dice, or may choose not to roll any dice. The ball is placed forward 11 squares plus the number shown on the die/dice if it/they was/were rolled.
If the ball goes beyond the end line then the receiver takes a first down from the sixth row.
If the ball stops in the end zone then the receiver can either take a first down from the sixth row or roll two dice. If the dice are rolled and subsequently the ball is not advanced out of the end zone a safety is conceded by the receiver.
If the ball does not go over the goal line then the receiver can either take a first down from the row on which the ball rests or roll two dice
If the dice show a total of 4 or 12 then exactly the same rules apply as when that happens for a Kick Off and Return Run. (Total 4, Total 12)
If the dice show any total other than 12 or 4 then the ball is advanced by the lowest number shown on the two dice, placed between the hash marks and the receiver take a first down. E.g. The dice show 6 and 2. The ball is moved forward two squares.
The ball is placed on the 2nd row within the hash marks and two dice are rolled. If the dice show a total of two the conversion is missed; any other total and the conversion is made. It is worth one point.
There is a 1 in 36 chance of missing.
The offense may choose to attempt a field goal from any scrimmage inside or on the defense's 11th row. A field goal is worth three points.
The ball is placed on the row of scrimmage within the hash marks and two dice are rolled. Success or failure depend on the the outcome of the dice.
After a field goal has been scored play restarts with a kick off from the 11th row.
After a missed field goal play restarts with a down from either the current row of scrimmage or the 6th row. Whichever is further away from the goal line is the one to use.
A forward pass is one in which the ball moves either vertically or diagonally forward.
A lateral pass is one in which the ball moves either vertically of diagonally backward or horizontally sideways.
A pass can be made to a receiver only in a straight line that is free of both offense and defense pieces (Compare to the movement of bishops and castles in chess).
In the diagram below the Quarterback can't make a pass to his left side receiver because the line of pass is blocked by a red Double. He can't make a pass to his right side receiver because the line of pass is blocked by a blue Triple. He can make a pass to his central receiver because the line of pass is clear.
Only one forward pass is allowed per play.
The piece making the forward pass must be behind the line of scrimmage.
There is no limit to the number of lateral passes which can be made in a play and they may be made anywhere on the board either in front of or behind the line of scrimmage.
Only interior linemen can't receive a forward pass.
Interior linemen can't move more than one square beyond the line of scrimmage until after the forward pass has been made.
All pieces can make and receive lateral passes.
Pass distances exclude the square on which the passer stands but includes the square on which the receiver stands.
The Quarterback can make a maximum pass distance of fifteen squares. All other pieces can make a maximum pass distance of six squares.
When a player wishes
to make a pass he must first place the ball on the intended receiver.
The receiver is close marked when an opposition piece is adjacent to it.
(Note that this means a Triple or Quarterback can
never be close marked by a Single, and vice versa)
The offense will always have to roll TWO dice to see if the pass in complete or incomplete. (Caught or dropped)
If a forward pass is incomplete from a first down the offense must restart with a second down from the current row of scrimmage.
If a forward pass is incomplete from a second down then the offense lose possession and the opposition take a 1st down from the current row of scrimmage.
If a forward pass is thrown on a second down into the opposition end zone and the pass is incomplete the opposition take a 1st down from either the 6th row or the current row of scrimmage. Whichever is further away from the goal line is the one to use.
If a forward pass
is complete then play continues.
If a lateral pass, including the snap, is missed then the number wheel is spun and the ball is placed on the appropriately numbered square away from the intended receiver as described in the section on fumbling, because a missed lateral is treated exactly the same as a fumble with regard to restarting play, safeties etc. apart from the exceptions given in the next two paragraphs.
If, from a fumbled lateral pass, a defense piece picks up the ball there is an immediate turnover. The new row of scrimmage is the same row on which the ball was put.
If, from a fumbled lateral pass, the ball is put back onto the piece which made the pass in the first place, don't worry, play on.
To find out how many squares away from an intended receiver to put the ball look at the numbers shown on the dice. If any die shows a 2 then the ball is put 2 squares away, otherwise it is always put 1 square away.
The example below shows a red Double picking up a fumbled ball and moving on.


Interceptions
If the offense piece intends to attempt a pass to a receiver which is close marked by a defense piece, and the defense piece is nearer to the passer than the receiver is, then the defense piece can try to intercept the pass.
To try to intercept the pass the defense piece is moved one square so that it is directly between the passer and receiver (i.e. on the line of pass). Then the defense player will roll two dice to see if his attempt is successful. (See later)
In the example below the red Quarterback is going to attempt a forward pass to the red Triple as shown by the arrow. The ball is put on the intended receiver.
The top blue Triple is not nearer to the red Quarterback than the red Triple so it can't attempt an interception, but the bottom blue piece is nearer to the Quarterback than the red Triple and can attempt an interception. The blue player decides to attempt an interception and moves his piece into the line of pass. He rolls the dice and they show a total of 8. The interception is therefore successful. (See below) The ball is put onto the blue and away he runs.
There are three possible outcomes of an attempted interception. They are determined as follows.
The dice show a total of 7. The defense piece is considered to have missed the ball altogether and the offense then rolls two dice as usual to see if the pass is completed or not. The defense piece is considered to have completely committed itself to the interception and is marked with a missed tackle marker so that it can take no part in the play. (See Pieces Marked With A Missed Tackle Marker)
The dice show
a total of 4. The defense piece is considered to have knocked
the ball away - not caught it. If that happens from a forward pass then
the pass is incomplete and play restarts either with a second down or
a loss of possession. If that happens from a lateral pass then the pass
is missed and the defense player spins the number wheel to see in which
direction the ball flies off, as described in the section on fumbling.
Note that the ball bounced off the piece which tried for the interception
and not the intended receiver so the direction and distance of
the ball is calculated from the defense piece and the defense player's
point of view. Play continues as described in the section on fumbling.
The dice show any total other than 4 and 7. The interception is successful. The ball is placed on the defense piece which made the interception. After an interception there is a turnover and the new offense takes its two moves straight away. There is no scrimmage and the turnover occurs immediately - even if the player attempting the pass has taken only one of his two moves. After a successful interception the ball can't be passed forward but can be passed laterally.
Each move should be accomplished within an agreed time limit.
Therefore players should use a timing device. E.g. A chess clock, an egg timer etc.
A move has been accomplished when the pieces and/or ball have been moved.
Rolling of the dice for tackles, interceptions and so on are not timed.
If the offense do not accomplish a move within the agreed time limit there is an immediate turnover and the opposition take a first down from the current row of scrimmage.
If the defense do not accomplish a move within the agreed time limit then the offense are awarded a first down 5 rows nearer to the defense end zone than the current row of scrimmage
E.g. On a forward passing play the offense must have finished moving a piece and the ball within the agreed time limit. That being accomplished the dice may then be rolled to see whether the pass is complete or incomplete.